

Photoshop Elements 14 Not Responding
Whether you're working on a website, mobile app or even a brochure layout, there is always a period of time before you've fully locked down your colour palette. Even when you have, you may not know where each of the colours will be applied or if there will be lighter or darker shades used in certain instances. The subtle differences between #ccc and #aaa are significant enough that you may want to try multiple variations of colours in that range before you find the perfect grey.
When you're knee-deep in Photoshop layers, it can be painfully slow to manipulate the colours across multiple objects, especially if you want to go back and forth on a few different options while you're experimenting.
If you have a handful of icons and text on separate layers, your only options are going through and selecting each layer to change the colours. Using colour overlay layer fx can help speed things up in some scenarios, but by and large it's frustrating that Photoshop doesn't support global colour swatches the same way Illustrator does.
In the meantime, there is a neat little Smart Object hack that can produce really speedy results when you want to quickly change colours across an entire Photoshop document. It takes a little effort up-front to get the swatches set up, but once everything's in place, colour swapping across layers becomes almost instantaneous.
.01 Get started
First download the sample project files. The layers include items from a simple iOS7 iPhone app layout: a title bar and a standard list view with text and icons. We'll be creating smart swatches to be used for the title bar background as well as the icons in the list.
02. Starter shapes
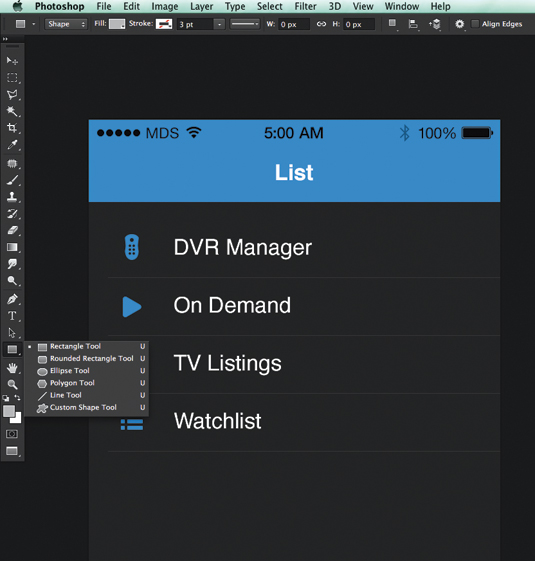
Once you've opened the Photoshop file, use the Shape tool (U) to draw a rectangle shape on the canvas, holding the Shift key to maintain equal proportions.
The colour of the shape will be determined by the foreground colour in your tool panel. To change the colour, either change the foreground colour before you draw the shape, or double-click the shape layer afterwards.
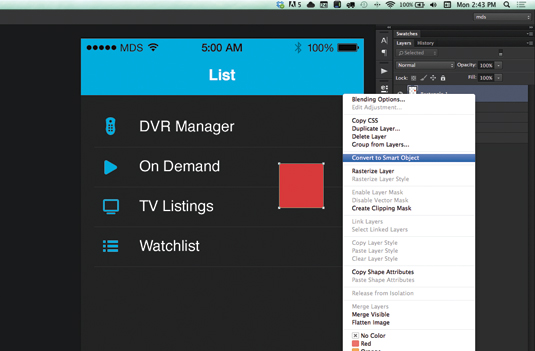
03. Layers
Once you've got the shape drawn, convert the layer into a Smart Object by right-clicking on the layer and selecting Convert to a Smart Object . You can also do this by selecting Layer>Smart Objects >Convert to Smart Object. Once you've got your Smart Object created, double-click the name in your layers panel and rename it.
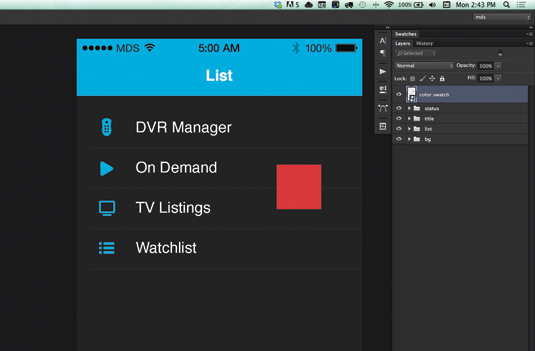
04. Position your swatch
Select the Move tool (V) and position your colour swatch over the title bar background shape. With your smart swatch selected in the Layers panel, select Edit> Transform>Scale or hit Cmd+T to bring up the Free Distort options on the Smart Object. Now stretch the colour swatch until it covers the entire title. Don't worry if it overlaps. Double-click the object again to apply the changes.
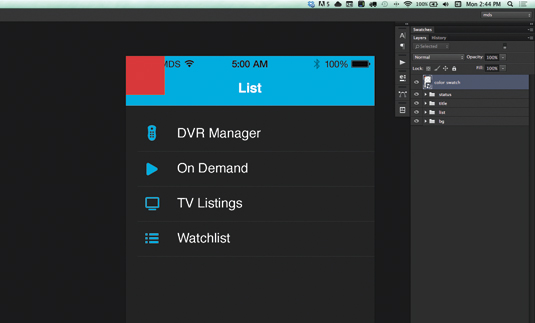
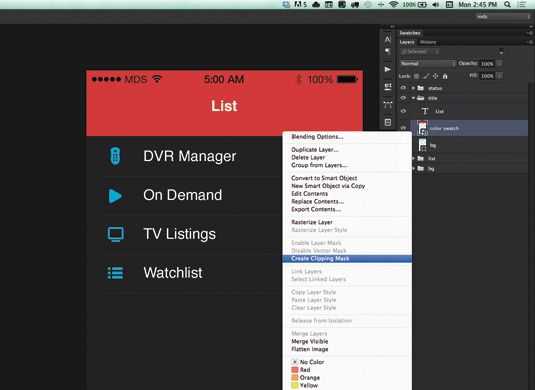
05. Clipping mask
Position your colour swatch layer just above the bg layer in the title layer group. With your colour swatch in place, create a clipping mask by right-clicking on the layer and selecting create clipping mask or Layer>Create Clipping Mask.
You can alternatively Alt+click in-between the two layers to create a clipping mask more quickly. You will now see that the title text has taken the colour property of the Smart Object colour swatch.
06. Copy your smart object
With the Smart Object layer selected, make a copy of your Smart Object colour swatch by holding the Alt key and dragging a copy of the colour swatch layer to the top of your Layers panel. Another way to quickly create a copy of a layer is by hitting Cmd+J with the layer selected. You will now have two instances of the Smart Object in your document.
07. Stretch the swatch
Position the newly created instance of your swatch over the remote icon in the list group. Now stretch (Cmd+T) the colour swatch vertically to extend past all the icons in the list.
You could stretch the colour swatch to only extend slightly beyond the borders of the single icon, but since we are making all of the icons the same colour, stretching the swatch to cover everything will make it faster to apply the swatch to each icon.
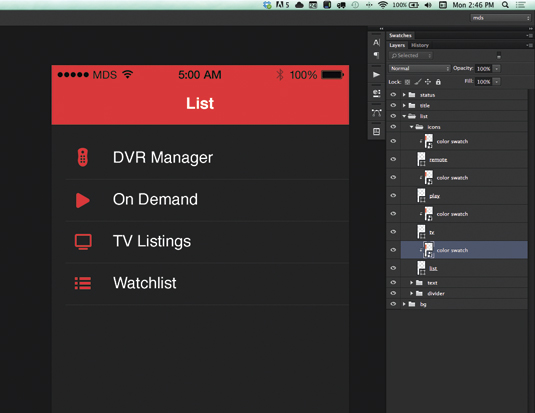
08. Make a clipping mask
Once your smart swatch is in position, create a clipping mask for the colour swatch using the remote icon shape below. To do this Alt+click in-between the layers or right-click the swatch layer and choose Create Clipping Mask.
09. Create a copy
Now with the first icon finished, create a new copy of the colour swatch and position it just above the play icon in the Layer panel, which is next in the list group. Because the colour swatch is already stretched to cover all of the icons, you can create a clipping mask without needing to resize the colour swatch.
If you haven't tried it already, Alt+click in-between the smart swatch and the play icon to quickly create a clipping mask. Your mouse icon will change when your cursor is in position and the Alt key is held. Once you see the change, click to set the mask.
10. Do some duplication
Repeat Step 9 for the remaining two icons in the list group. This will give you a smart colour swatch for each element in the PSD. Remember that this method will also work if you're using primary and secondary colours within the same document, you'll just need to create two different Smart Objects and copy them separately as required for your project.
11. Open Smart Objects
With all of the colour swatches now in place, double-click any of the colour swatch Smart Objects. This will open the Smart Object in a separate window with the original editable shape layer in the layers panel.
12. View all the documents
From the menu bar, choose Window>Arrange>Tile All Vertically. This will allow you to view both documents at once. Keep an eye on the layers panel to give yourself a bearing for which document is currently active.
13. Choose some colours
Double-click the colour swatch shape in the Smart Object Layers panel to change its colour. Choose any new colour and hit OK. Save the Smart Object document (Cmd+S).
Every instance of your smart colour swatch will be updated to its new colour in the main Photoshop document. Once you've saved the edited Smart Object, close the document by selecting File>Close or hitting Cmd+W.
14. Job done
That's it, you're done! This technique can save lots of time when you want to experiment with different colour options. Try using multiple smart colour swatches for keeping a global editable colour palette of your documents' most used colours.
Finally, I've created a PSD of the final product, which you can download a PSD.
Words: Matt D. Smith
Matt D. Smith is an expert in branding and interface design. This article originally appeared in net magazine issue 257.
Photoshop Elements 14 Not Responding
Source: https://www.creativebloq.com/photoshop/change-colour-multiple-elements-121413516
Posted by: valenzuelacountim.blogspot.com
0 Response to "Photoshop Elements 14 Not Responding"
Post a Comment